
One of the more advanced ways traders use gamma exposure (GEX) is to estimate how market makers may hedge their positions as price moves through key levels.
This matters because dealer hedging activity can directly influence short-term market behavior. In some environments, hedging can suppress volatility and stabilize price. In others, hedging can amplify moves and accelerate momentum.
Understanding these mechanics helps traders interpret why the market behaves differently around certain price levels – especially during high-volume options expirations or volatile sessions.
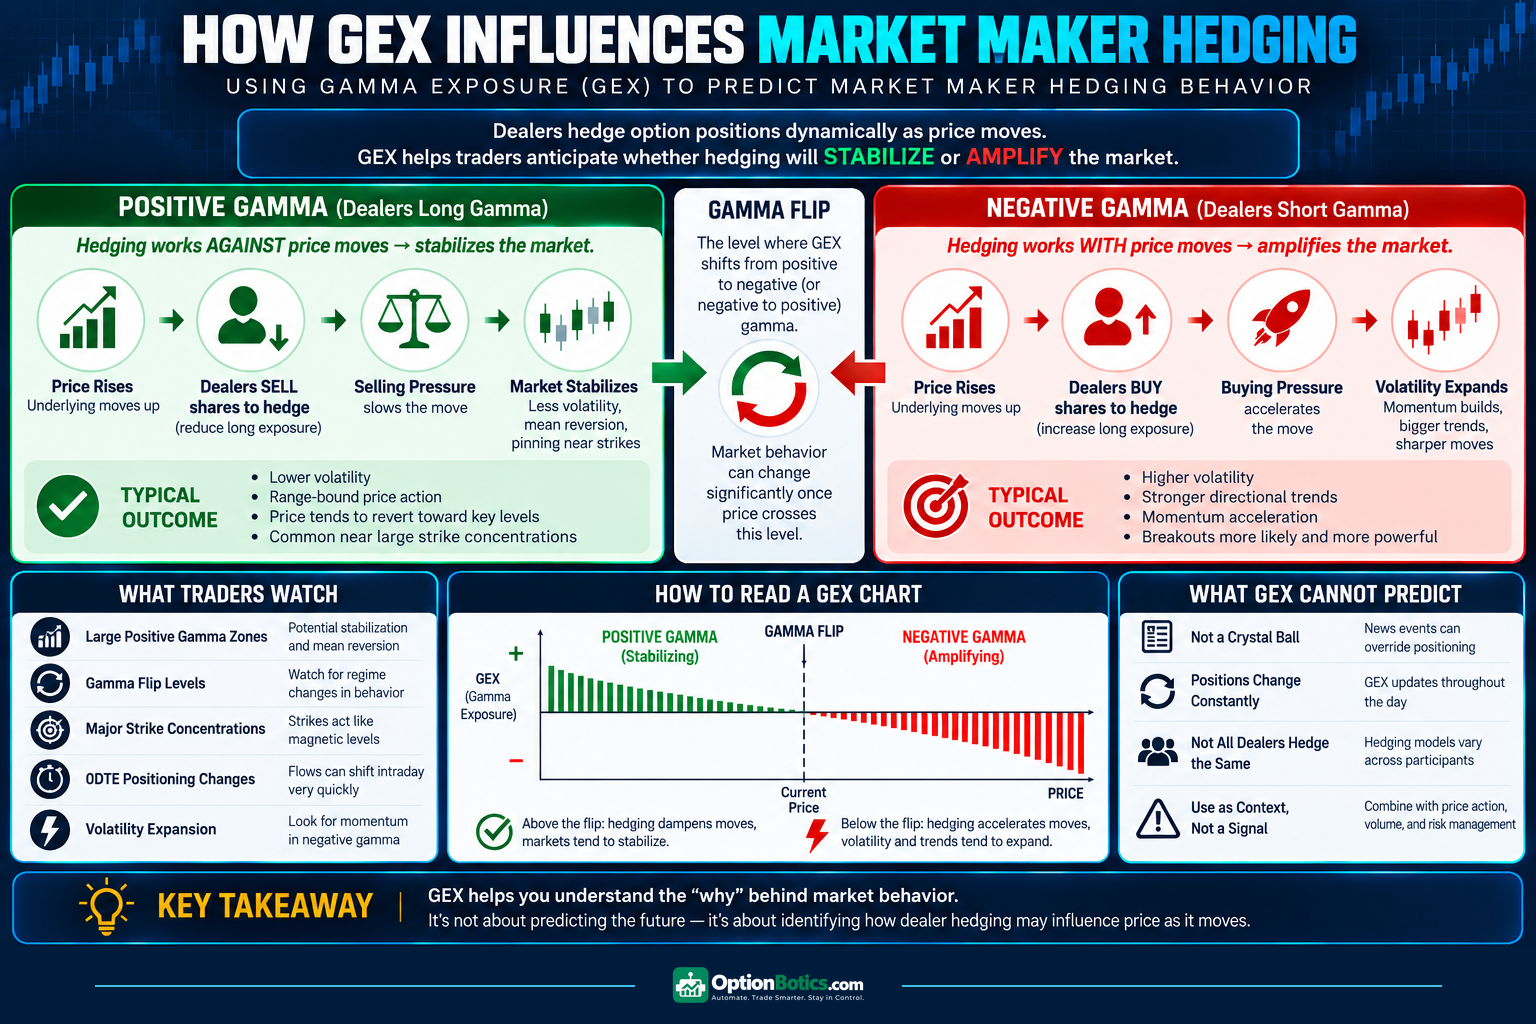
What Traders Mean by Market Maker Hedging
Market makers frequently take the opposite side of options trades in order to provide liquidity. Because of this, they often carry directional exposure that must be hedged dynamically as price changes.
Instead of simply holding directional risk, dealers typically hedge by buying or selling shares of the underlying asset.
The amount and direction of this hedging activity can change rapidly depending on:
Gamma exposure helps traders estimate how this hedging behavior may impact price movement.
Positive Gamma: Why Markets Often Stay Stable
When dealers are in a positive gamma environment (often called long gamma), their hedging behavior tends to suppress volatility.
In this environment:
This creates hedging flows that work against price movement, often leading to:
This is one reason why markets sometimes appear unusually stable around large options expiration levels.
Negative Gamma: Why Volatility Can Expand
In a negative gamma environment (often called short gamma), dealer hedging behavior can amplify price movement instead of suppressing it.
In this environment:
This creates hedging flows that move with price movement, which can contribute to:
Traders often pay close attention to these environments because price can move much faster once hedging flows begin reinforcing momentum.
For a practical breakdown of how traders apply these concepts, see how traders actually use GEX in options trading.
Why Gamma Flip Levels Matter
One of the most important concepts in GEX analysis is the gamma flip.
This is the level where dealer positioning may shift from positive gamma to negative gamma (or vice versa).
Traders monitor these levels closely because market behavior can change significantly once price crosses them.
For example:
These transitions are not guaranteed, but they help traders frame expectations for how price may react as hedging flows adjust.
What Traders Actually Watch
Most traders using GEX are not trying to “predict the future.” Instead, they are estimating how dealer hedging flows may react if price moves into key areas.
Common things traders monitor include:
Some traders combine this with breakout systems and momentum strategies to identify areas where volatility may accelerate.
See also opening range breakout strategies.
What GEX Cannot Predict
Gamma exposure is a useful framework, but it is not a crystal ball.
Important limitations include:
Because of this, GEX should be used as contextual information rather than a standalone trading signal.
Using GEX with Automated Trading Systems
Some traders use GEX levels directly inside automated trading systems.
For example, systems may:
This allows traders to align their strategy behavior with changing market structure.
For more on this, see using automation in options trading.
Final Thoughts
Using GEX to estimate market maker hedging behavior is less about predicting exact price movement and more about understanding how positioning may influence market structure.
Positive gamma environments often create stabilization and mean reversion, while negative gamma environments can amplify volatility and momentum.
By understanding these dynamics, traders can better interpret why markets behave differently around key levels – especially during high-volume expiration periods and volatile trading sessions.
If you want to explore how traders use GEX and automation together inside structured systems, review the tools and workflows featured on OptionBotics.com.